View Transfer History for This Client (Business Admin only)
Transfer This Client to a Different Service Area and/or Program
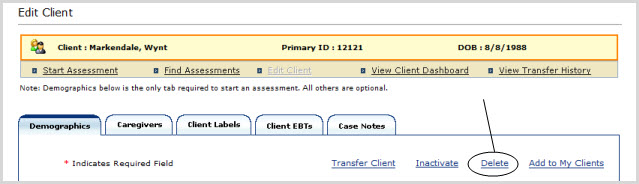
Delete This Client (Business Admin only)
The Client Header at the top of the present page displays information in the red-framed yellow box about the Client currently selected: the Client's name (1, above), Primary ID (2) and date of birth (3).
The present Edit Client page is listed as an option under the "Edit Client" link in the tan-colored box below the Assessment Header, among the User's "Client Options". For help navigating these options, continue reading here.
The Demographics tab is the default tab for the Edit Client page. The selected Client's information will already be entered:
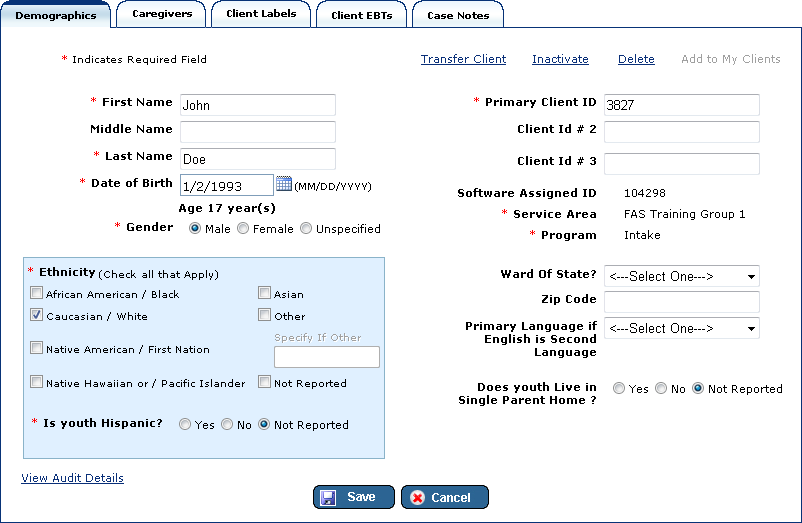
Make changes to the fields provided as desired. A few details are included below for some of the fields.
Primary Client ID: A unique identifier for your Client in FAS Outcomes. Do not use the Client's Social Security number as their Primary Client ID.
Client Id #2 and #3: These are non-unique tags that can be used at the user's discretion. The names for the tags can be modified to be indicative of what they are for. Potential uses could include State ID, County ID, System of Care ID, etc.; any grouping could be used to help sort Clients.
Service Area: The first level of hierarchy used to group Clients. All Clients are required to be part of a Service Area and Program. Service Areas must be created by your Super IT Admin.
Program: The second level of hierarchy used to group Clients. All Clients are required to be part of a Service Area and Program. Programs must be created by an IT Admin.
Service Area and Program cannot be modified here, and are displayed for reference not as editable fields. To change a Client's Service Area or Program you must perform a Client Transfer, which can be done by clicking the "Transfer Client" link at the top of the tab.
Click either Save button to save changes, click another tab to view or edit other Client information, or click Cancel to cancel action. (Clicking Cancel will send you to the Client Search page.)
Note: If you save changes to any Client, they are automatically added to your My Clients list.
Click on the Caregivers tab:

Click the "Add New Caregiver " link on the right just above the List of Caregivers:

The Add New Caregiver form will appear as a shadowbox over the present page.
Enter Caregiver information in the fields provided.
Click Save, or click Cancel or Close to cancel action. The List of Caregivers will be restored and refreshed to reflect any successfully added Caregiver.
|
In order to save Caregiver information, fields marked with a red asterisk (*) may not be left blank. |
In the List of Caregivers, click on the name of the Caregiver you wish to edit:

The Edit Caregiver form will appear as a shadowbox over the present page.
Make changes to the fields as desired.
Click Save, or Cancel or Close to cancel action.
|
In order to save Caregiver information, fields marked with a red asterisk (*) may not be left blank. |
The List of Caregivers can be sorted by Name, Caregiver ID or Relationship.
Click on the corresponding column header by which you wish to have the List sorted:

A small white arrow will appear next to (or underneath) the column header you just clicked, indicating whether the list is being sorted in ascending or descending order by the attribute selected:

To sort in reverse order, click on the same column header a second time, or on the small white arrow.
To return to the default order, click the column header a third time.
Click on the Client Labels tab:

Adjust select fields as desired.
Click either Save button to save changes, click another tab to view or edit other Client information, or click Cancel to cancel action. (Clicking Cancel will send you to the Client Search page.)
Note: If you save changes to any Client, they are automatically added to your My Clients list.
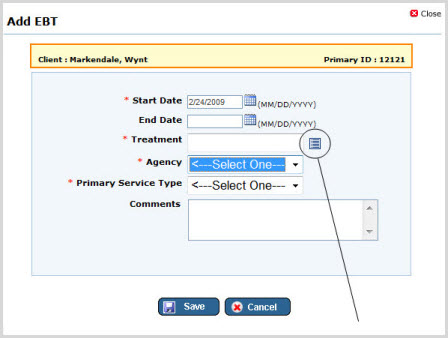
To view a Client's History of Evidence Based Treatments, click on the Client EBTs tab:

Click the "Add new Treatment" link on the right just above the List of Caregivers:

The Add EBT form will appear as a shadowbox over the present page.
Enter treatment information in the fields provided.
To enter a Treatment, click the icon to the right of the Treatment field:
|
|
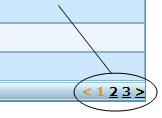
Note: if there are more than five Treatments in the displayed list, they will be displayed in groups of five. Navigate between groups using the numbers and arrows immediately beneath the Treatment listing, on the right. (Circled, left.) |
Treatments can also be found by simple search. (See below.)

Click Save, or click Cancel or Close to cancel action. The EBT History page will be restored and refreshed to reflect any successful EBT addition.
|
In order to save EBT information, fields marked with a red asterisk (*) may not be left blank. All other fields are optional. |
Click on the Start Date of the treatment you wish to edit. (See below.)

The Edit EBT form will appear as a shadowbox over the present page.
Make changes to the fields as desired.
Click Save, or Cancel or Close to cancel action.
|
In order to save EBT information, fields marked with a red asterisk (*) may not be left blank. |
The EBT History can be sorted by Start Date, End Date, Treatment, Agency or Primary Service Type.
Click on the corresponding column header by which you wish to have the List sorted.

A small white arrow will appear next to (or underneath) the column header you just clicked, indicating whether the list is being sorted in ascending or descending order by the attribute selected:
To sort in reverse order, click on the same column header a second time, or on the small white arrow.
To return to the default order, click the column header a third time.
Click on the Case Notes tab (below) and follow the on-screen directions:
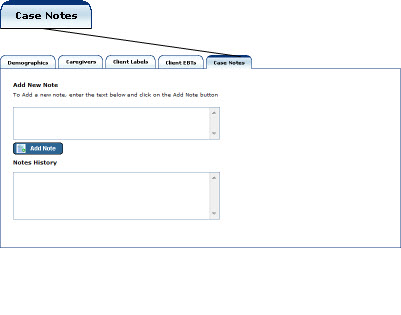
|
Case Notes cannot be edited or deleted. |
Links to Client Options (i.e. pages for which a specific Client is already selected) appear in the lower, tan-colored box of the Client Header (items 1 thru 5):

You can start a new Assessment for the selected Client by clicking the "Start Assessments" link (1, above), and then selecting a Measure.
To view all of the selected Client's Assessments, go to the Find Assessments page (2, above).
(You are currently on the Edit Client page, so item 3, above, will be inactive.)
To view the selected Client's Client Dashboard, click the corresponding link: JIFF, CAFAS, PECFAS, CWL (4).
Finally, if you are a Business Administrator and want to view the selected Client's Transfer History, click that link (5).
Click on the "Start Assessments" link near the top of the page:

A shadowbox will appear containing one or more options. Click on the Assessment Type you wish to start for this Client.
To access the Find Assessments page for this Client, click on the "Find Assessments" link near the top of the page:

To view the Client Dashboard for this Client, click on the "View Client Dashboard" link near the top of the page:

To view Help for the selected Client's Client Dashboard, click the corresponding link: JIFF, CAFAS, PECFAS, CWL (4).
To view the Client Transfer History for this Client, click on the "View Transfer History" link near the top of the page:
![]()
Clients can be transferred at the Transfer Client page. Access to this page is via the "Transfer Client" link, near the top of the Demographics tab:
![]()
If your User Role allows you to transfer the selected Client, the "Transfer Client" link will be active. To transfer the selected Client, click on this link.
An "Inactivate" or "Activate" link appears near the top of the Demographics tab, depending on the present Active/Inactive Status of the Client.
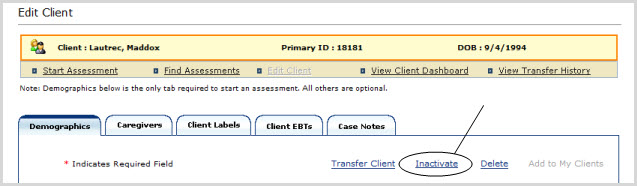
To change the Active/Inactive status of the selected Client, click on this link.
If the selected Client is not yet on your My Clients list, the "Add to My Clients" link will be active:

To add the selected Client to your My Clients list, click that link.
If the selected Client is not yet on your My Clients list, the "Add to My Clients" link will be active:
To add the selected Client to your My Clients list, click that link.
|
|
Deleting a client will delete all assessments associated with the client. |
|
|
Deleted Assessments do NOT appear in Data Exports. Deleted assessments DO appear in Web Service calls. |
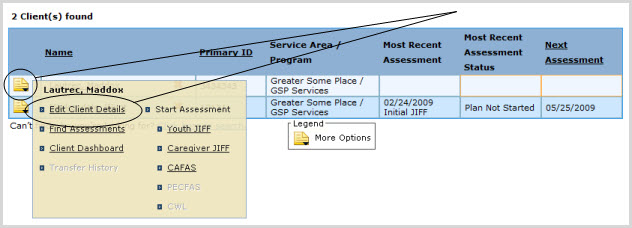
A Client can be selected for editing via the More Options icon, which appears to the immediate left of Clients' names wherever they appear in a listing, for instance on the My Clients page, or as the result of a Client Search on any of the various search pages: Client Search, Client Search by Caregiver, Admin Client Search or Exact Client Search.
To choose a different Client from My Clients for editing on the present page:
Expand the Clients tab in the Left Navigation Bar and click on My Clients.
Click the document icon to the immediate left of the name of the Client whose information you wish to view or edit. A small shadowbox will appear containing several link choices. Click on the "Edit Client Details" link: