
The Assessment Header at the top of the present page displays information in the red-framed yellow box about the Client and Assessment currently selected: the Client's name (1, above), Primary ID (2), date of birth (3) and the Assessment date and Administration (4).
The present Create Treatment Plan page is listed as "Treatment Plan" in the tan-colored box below the Assessment Header, among the User's "Assessment Options". For help navigating these options, continue reading here.
On this page, the PECFAS

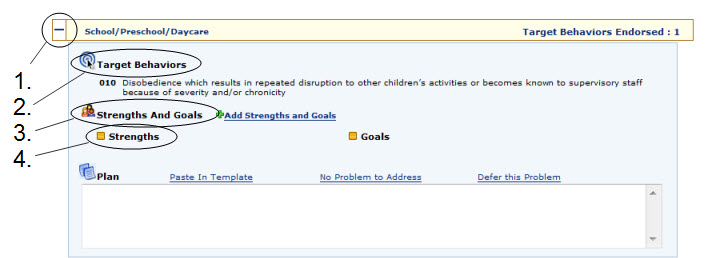
To expand or retract the tab, click on the "+" or "-" sign in the white box at the far left end of the tab's yellow header (1, above).
The highest PECFAS
Plan content is entered in the text box at the bottom, under Plan (4).
You can plan treatment within the subscale by adding or removing strengths and goals, and entering or editing plan details.
To add a strength or goal to a given subscale:
Click on the "Add Strengths and Goals" link:

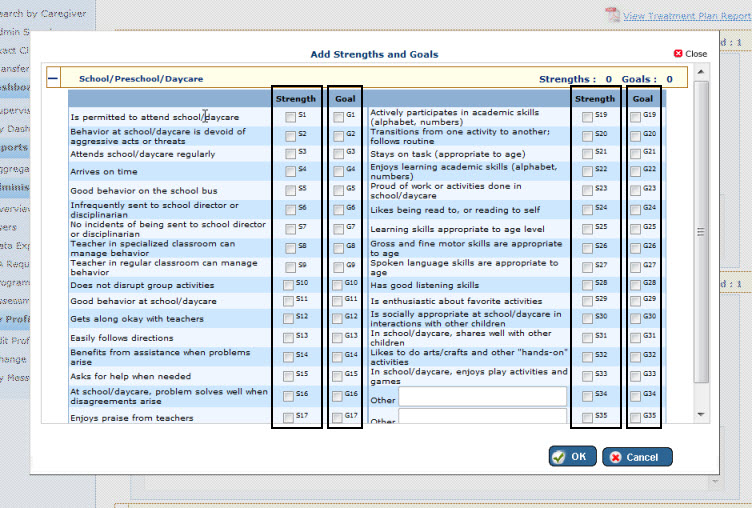
The Add Strengths and Goals form will appear as a shadowbox over the present page.
Check (or uncheck) boxes in the Strength or Goal columns (framed, above) corresponding to the item you wish to add (or remove) as a strength or goal.
Click the OK button when finished (circled, above), or Cancel or Close to cancel action.
|
Unlike the Add Strengths and Goals form on the PECFAS Item Endorsements page, the Add Strengths and Goals form on this page has an OK button, not a Save button. When you return to the Create Service Plan page after adding or removing strengths and goals, the message "Plan is modified and needs to be saved" will appear at the top of the form in red. To save changes, click the Save button at the bottom of the page. (NOTE: You may have to scroll down.) You will be prompted to save changes if you navigate away from the present screen without saving changes:
NOTE: If you navigate away from this page by any other means (e.g. using the left navigation or the top navigation), you will lose the changes you have made! |
Strengths and goals can be removed by clicking on the red "x" next to them where they are displayed within the subscale tab:

Strengths and goals can also be removed by unchecking them on the Add Strengths and Goals form.
|
NOTE: When you remove strengths or goals, the message "Plan is modified and needs to be saved" will appear at the top of the page in red. To save changes, click the Save button at the bottom of the page. (NOTE: You may have to scroll down.) You will be prompted to save changes if you navigate away from the present screen without saving changes:
NOTE: If you navigate away from this page by any other means (e.g. using the left navigation or the top navigation), you will lose the changes you have made! |
Plan text can be entered in the text box below the strengths and goals under each subscale.
Text can be entered freehand, the template can be pasted in and used (link 1, below - Note that your local administrator can change the text in the plan template), or the entries "No Problem to Address" and "Defer this Problem" can be entered quickly by clicking on those links just above the text box (2 and 3, respectively):

|
If you make any changes to Plan text, the message "Plan is modified and needs to be saved" will appear at the top of the form in red. To save changes, click the Save button at the bottom of the page. (NOTE: You may have to scroll down.) You will be prompted to save changes if you navigate away from the present screen without saving changes:
NOTE: If you navigate away from this page by any other means (e.g. using the left navigation or the top navigation), you will lose the changes you have made! |
The default template for entering Plan text is a series of headings that look like this:
|
Objectives: Intervention: Start Date: Frequency: Responsible Person/Monitor: Achieve/Review Date: |
|
NOTE: Your Organization's IT Super Administrator can edit this template, and may have, such that it is now different from what is shown above. The default template is the same across your Organization. |
Once the template is in place, you can click in the Plan text box and fill in the information accordingly.
To paste the template into the Plan text box, simply click the "Paste in Template" link:

|
NOTE: If the text box already has something in it when you click on "Paste In Template", the system will prompt you to confirm that you want to delete whatever was in the box previously. |
|
If you make any changes to Plan text, the message "Plan is modified and needs to be saved" will appear at the top of the form in red. To save changes, click the Save button at the bottom of the page. (NOTE: You may have to scroll down.) You will be prompted to save changes if you navigate away from the present screen without saving changes:
NOTE: If you navigate away from this page by any other means (e.g. using the left navigation or the top navigation), you will lose the changes you have made! |
Links to PECFAS "Assessment
Options" (i.e. pages for which a specific Client and PECFAS

These link to the following pages: PECFAS
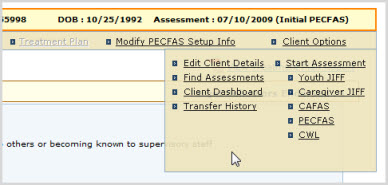
When you click on Client Options (item 5, above), a shadowbox will appear providing links to Client-specific (but not Assessment-specific) pages: Edit Client, Find Assessments, Client Dashboard, and the Client Transfer History (Business Administrators only) as well as the setup pages for starting new Assessments.
For the currently selected PECFAS
To access this page, click on the "PECFAS Items" link in the Assessment Header:

Reviewing a PECFAS
To access this page, click on the "Review Assessment & Print Report" link in the Assessment Header:

OR
click on the PECFAS Report button at the bottom of the page. (NOTE: you will probably need to scroll down.)
|
If you have not yet rated all Youth subscales, a pop-up alert will prompt you to that fact and ask you if you want to proceed. |
Reviewing a PECFAS
To access this page, click on the "Modify PECFAS Setup Info" link in the Assessment Header:

Client-specific (but not Assessment-specific) options are available at the Client Options link.
To access these options:
Click on the "Client Options" link:

A shadowbox will appear, containing links to Client-specific (but not Assessment-specific) pages: Edit Client, Find Assessments, Client Dashboard, and the Client Transfer History (Business Administrators only) as well as the setup pages for starting new Assessments:

Click on a link in the shadowbox to access the page in question.