|
NOTE: Always check first to see if a Client is already in the system before adding him or her as a new Client. Client Search is accessible via the Search Clients, Search by Caregiver, Admin Search and/or Exact Client Search links in the Left Navigation Bar under the Clients tab. (See left.) |
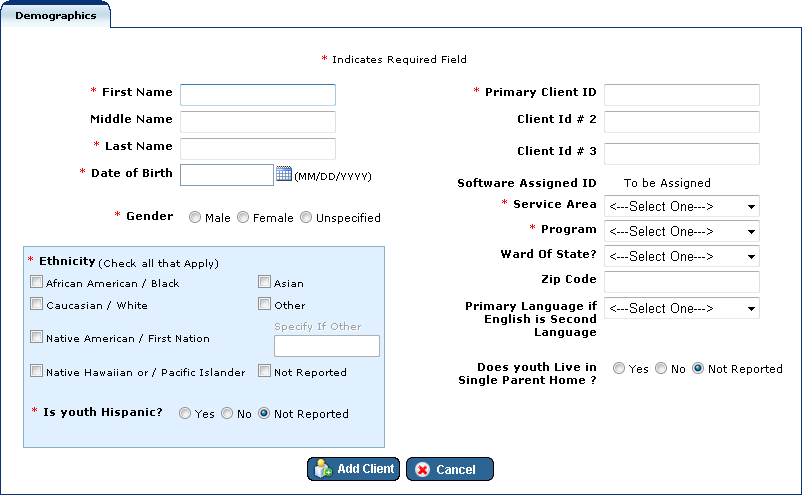
The Add New Client form is organized into five separate tabs. If you are adding a new client, only the first one - Demographics - appears at first:

Fill in the fields as indicated. A few details are included below for some of the fields.
Primary Client ID: A unique identifier for your Client in FAS Outcomes. Do not use the Client's Social Security number as their Primary Client ID.
Client Id #2 and #3: These are non-unique tags that can be used at the user's discretion. The names for the tags can be modified to be indicative of what they are for. Potential uses could include State ID, County ID, System of Care ID, etc.; any grouping could be used to help sort Clients.
Service Area: The first level of hierarchy used to group Clients. All Clients are required to be part of a Service Area and Program. Service Areas must be created by your Super IT Admin.
Program: The second level of hierarchy used to group Clients. All Clients are required to be part of a Service Area and Program. Programs must be created by an IT Admin.
Click Add Client to create a new client with the information entered, or Cancel to cancel action. (Clicking Cancel will send you to the Client Search page.)
Once you have clicked Add Client, you and your new Client will be on the Edit Client page, where you will have the option to enter more information for him or her under the Caregivers, Client Labels, Client EBTs and Case Notes tabs, as well as make changes under the Demographics tab.
After you have added a new Client (i.e. entered information into the Demographics tab and clicked Add Client) your new Client will be on the Edit Client page, where there will be a "Start an Assessment" link.
A Client already in the system can be pulled up in a Client Search and then added to My Clients.
When you add a Client to the system, the Client will be automatically be added to your My Clients list.
|
Always check first to see if a Client is already in the system before adding him or her as a new Client. |
You can check to see if a Client you wish to add to My Clients is already in the system by searching for the Client on the Client Search, Client Search by Caregiver or Admin Client Search pages. To access these pages, expand the Clients tab in the Left Navigation Bar and click on the appropriate link. (If you find the Client you wish to add to My Clients, an option to "Add to My Clients" will appear as an option when you click on the document icon to the immediate left of the Client's name in the search listing.)
Client information can be edited on the Edit Client page.
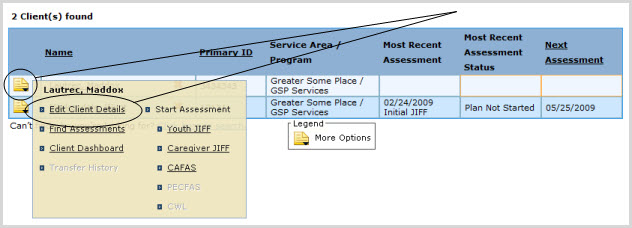
This page can be accessed via the More Options icon, which appears to the immediate left of Clients' names wherever they appear in a listing, for instance on the My Clients page, or as the result of a Client Search on any of the various search pages: Client Search, Client Search by Caregiver, Admin Client Search or Exact Client Search.
To select a Client from your My Clients page to modify on the Edit Client page:
Expand the Clients tab in the Left Navigation Bar and click on My Clients.
Click the document icon to the immediate left of the name of the Client whose information you wish to view or edit. A small shadowbox will appear containing several link choices. Click on the "Edit Client Details" link:

Client information can be edited on the Edit Client page. Caregiver information can be edited on the same page, under the Caregivers tab.
To access this page:
Expand the Clients tab in the Left Navigation Bar and click on My Clients.
Click the document icon to the immediate left of the name of the Client whose information you wish to view or edit. A small shadowbox will appear containing several link choices. Click on the "Edit Client Details" link:
