|
Note: if there are more than ten Service Areas in the displayed list, they will be displayed in groups of ten. Navigate between groups using the numbers and arrows immediately beneath the Service Area Listing, on the right. (Circled, left.) |
By default, the Service Area Listing will only show active Service Areas. Click Active, Inactive or Both radio buttons to control which Service Areas are listed below.
|
Note: if there are more than ten Service Areas in the displayed list, they will be displayed in groups of ten. Navigate between groups using the numbers and arrows immediately beneath the Service Area Listing, on the right. (Circled, left.) |
The Service Area Listing can be sorted by FAS User name (last name only), Code or status.
Click on the corresponding column header by which you wish to have the listing sorted. (See below.)
A small white arrow will appear next to (or underneath) the column header you just clicked, indicating whether the list is being sorted in ascending or descending order by the attribute selected. (See below.)
To sort in reverse order, click on the same column header a second time, or on the small white arrow.
To return to the default order, click the column header a third time.
To add a new Service Area:
Click the "Add a New Service Area" link in the upper right. (See below.)
The Add Service Area form will appear as a shadowbox over the present page.
Enter Service Area Code, Name and Status (active/inactive). Note: all fields are required.
Click Save, or click Cancel or Close to cancel action. The Service Area Listing page will be restored and refreshed to reflect any new Service Area successfully added.
To edit a Service Area's information, including its active/inactive status:
Click on the Service Area Name as shown in the Service Area Listing on the present page.
The Edit Service Area form will appear as a shadowbox over the present page.
Make changes to Service Area Name, Code and Status as desired.
Click Save, or click Cancel or Close to cancel action. The Service Area Listing page will be restored and refreshed to reflect any successful changes made.
|
In order for changes to be saved, neither the Service Area Name nor Code field may be left blank. |
A Service Area's Programs can be viewed and/or edited on the Organization - Program Listing page.
To pull up a Service Area's Programs on the Program Listing page:
Find the Service Area in the Service Area Listing.
|
Remember that some Service Areas may carry over to another page if there are more than ten, and that an inactive Service Area will not show up on a listing of active ones and vice versa. |
Click on the number of Programs the Service Area has, as shown in the Programs column. (See below.)
Assigning or unassigning Users to Service Areas and/or Programs is accomplished in the Users area.
To manage Users:
Expand the Administration tab in the Left Navigation Bar and click on Users (below),
OR
Click the "Home" link on the right just above the orange line, and then click the "Users" link on the Admin Home page.
Adding JIFF
To access this page:
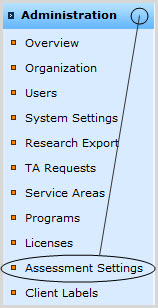
Expand the Administration tab in the Left Navigation Bar and click on Assessment Settings (below),

OR
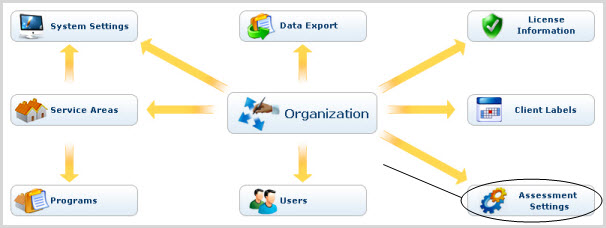
Return to Admin Home either by clicking the " Home" link on the right above the orange line, or expanding the Administration tab in the Left Navigation Bar and clicking on Overview. (See below.)


Click on Assessment Settings. (See below.)
